

World of Rope Play
-
Rope Play Basics and Safety
Ready to explore the fascinating and thrilling world of rope play? With the right preparation, rope play can be incredibly arousing. Let’s make sure you know the basics.
Before starting, do a few gentle stretches with your partner and talk about boundaries, desires, and safe words. Keep an eye on the ropes so they don’t become too tight, and never tie around joints. Monitor the time, and check in with your partner often to make sure they’re not having any tingling or numbness.
Have a safety kit nearby in case you need a quick removal of the rope. Your safety kit should include scissors.
When you’re done with your rope play, apply liberal amounts of cream and massage the skin where the ropes were wrapped around your partner.
And lastly, to store the rope, fold the rope in half, leaving your bight longer than your ends. Fold in half again, matching to the ends, and then just tie a regular knot. This will prevent your rope from getting tangled, and will be easy to untie when you’re ready to play.
Shibari or Rope Play is all about being creative and connecting with your partner. It’s a new way to explore and be intimate and by getting wrapped up in each other. Enjoy leaning into the sensations, the restrictions, and finding out which ties best enhance your play.
-
Single Column
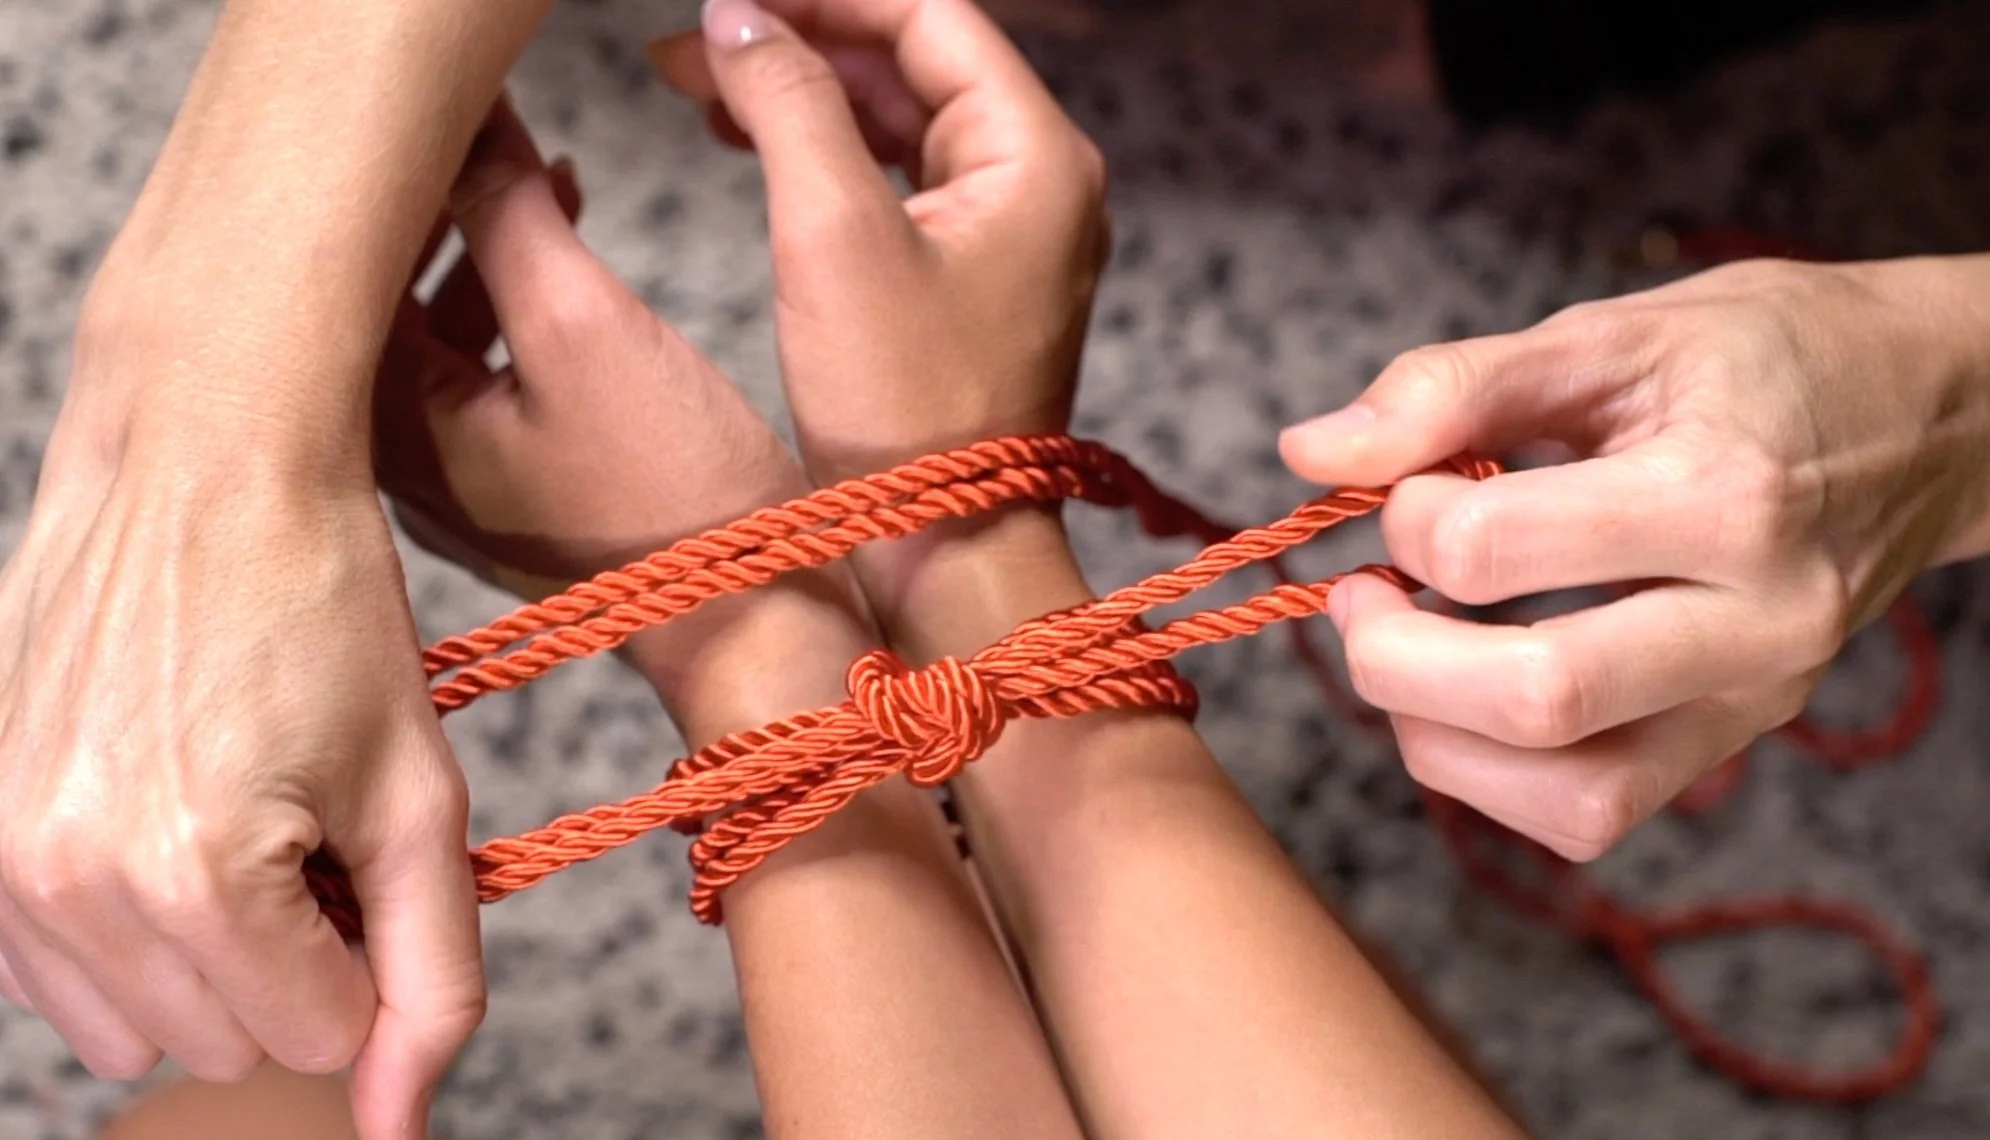
The single column tie with a square knot is a great place to start if you’re new to ropes. It’s easy to tie and helps set your desired tension. Keep in mind though, that this knot leaves room to move, so it has potential to slip, but it’s great if you want to do a quick tie.
Before you start, fold the rope to find the Bight, which is the center of the rope. You’ll always do this when you start your tie in order to keep your ends even.
Begin by holding rope from the bight and wrap twice around the wrists, and make sure the wrists are facing each other to protect the inner wrist, and start below the wrist bone. You’ll end up with 3 wraps - bight, middle, tail. The tail in this instance is the rest of the rope. Make sure all 3 wraps are straight and not overlapping.
Pull the bight over the tail and under all the wraps.
Pass the bight under the tail, then over the tail and through the little loop that you created.
Pull the tail and bight in opposite directions horizontally to secure the knot. You’ll know you did it right because the rope ends will flip. Make sure to really lock down this knot - it can come undone if you do not properly tighten it.
So I do have a little wiggle room in this tie, and if I tried hard enough, i’d probably be able to escape. [closing sentence]
If you’re partner is a little nervous about “too tight” ropes this knot is perfect for your play. You’ll feel the tension of the rope but you’ll still be able to move around.
-
Sommerville Bowline
The somerville bowline is the rockstar knot that NEVER slips.This is also a single column, and begins similarly, but unlike the square knot, this one is non-collapsible.
Once again, you’ll fold your rope in half to find the middle of the rope, or the “bight”.
Begin by holding rope from the bight and wrap twice around the wrists, and make sure they are facing each other to protect the inner wrist, and that you start below the wrist bone. You’ll end up with 3 wraps - bight, middle, tail. The tail in this instance is the rest of the rope. Make sure all 3 wraps are straight and not overlapping.
Form a loop around the bight with the tail, making sure the running end of the tail is facing the wrists. Here, you want to make sure your desired tension is set, because you won’t be able to correct this one once you tie the knot.
Pull the bight through the loop you created and over the tail.
Then, pull the bight under all the wraps and back up through the loop.
Hold the bight - but don’t pull. Then only pull the tail to tighten down the knot. Hold the knot and pull vertically from both directions to secure the knot.
Because this knot is super secure, you can explore all your rope play fantasies without unraveling.
-

Double Column
The double column tie is the perfect choice for tying up your partner’s lower body. This will give a restrictive sensation similar to handcuffs, and the extra wraps give it just the right amount of support.
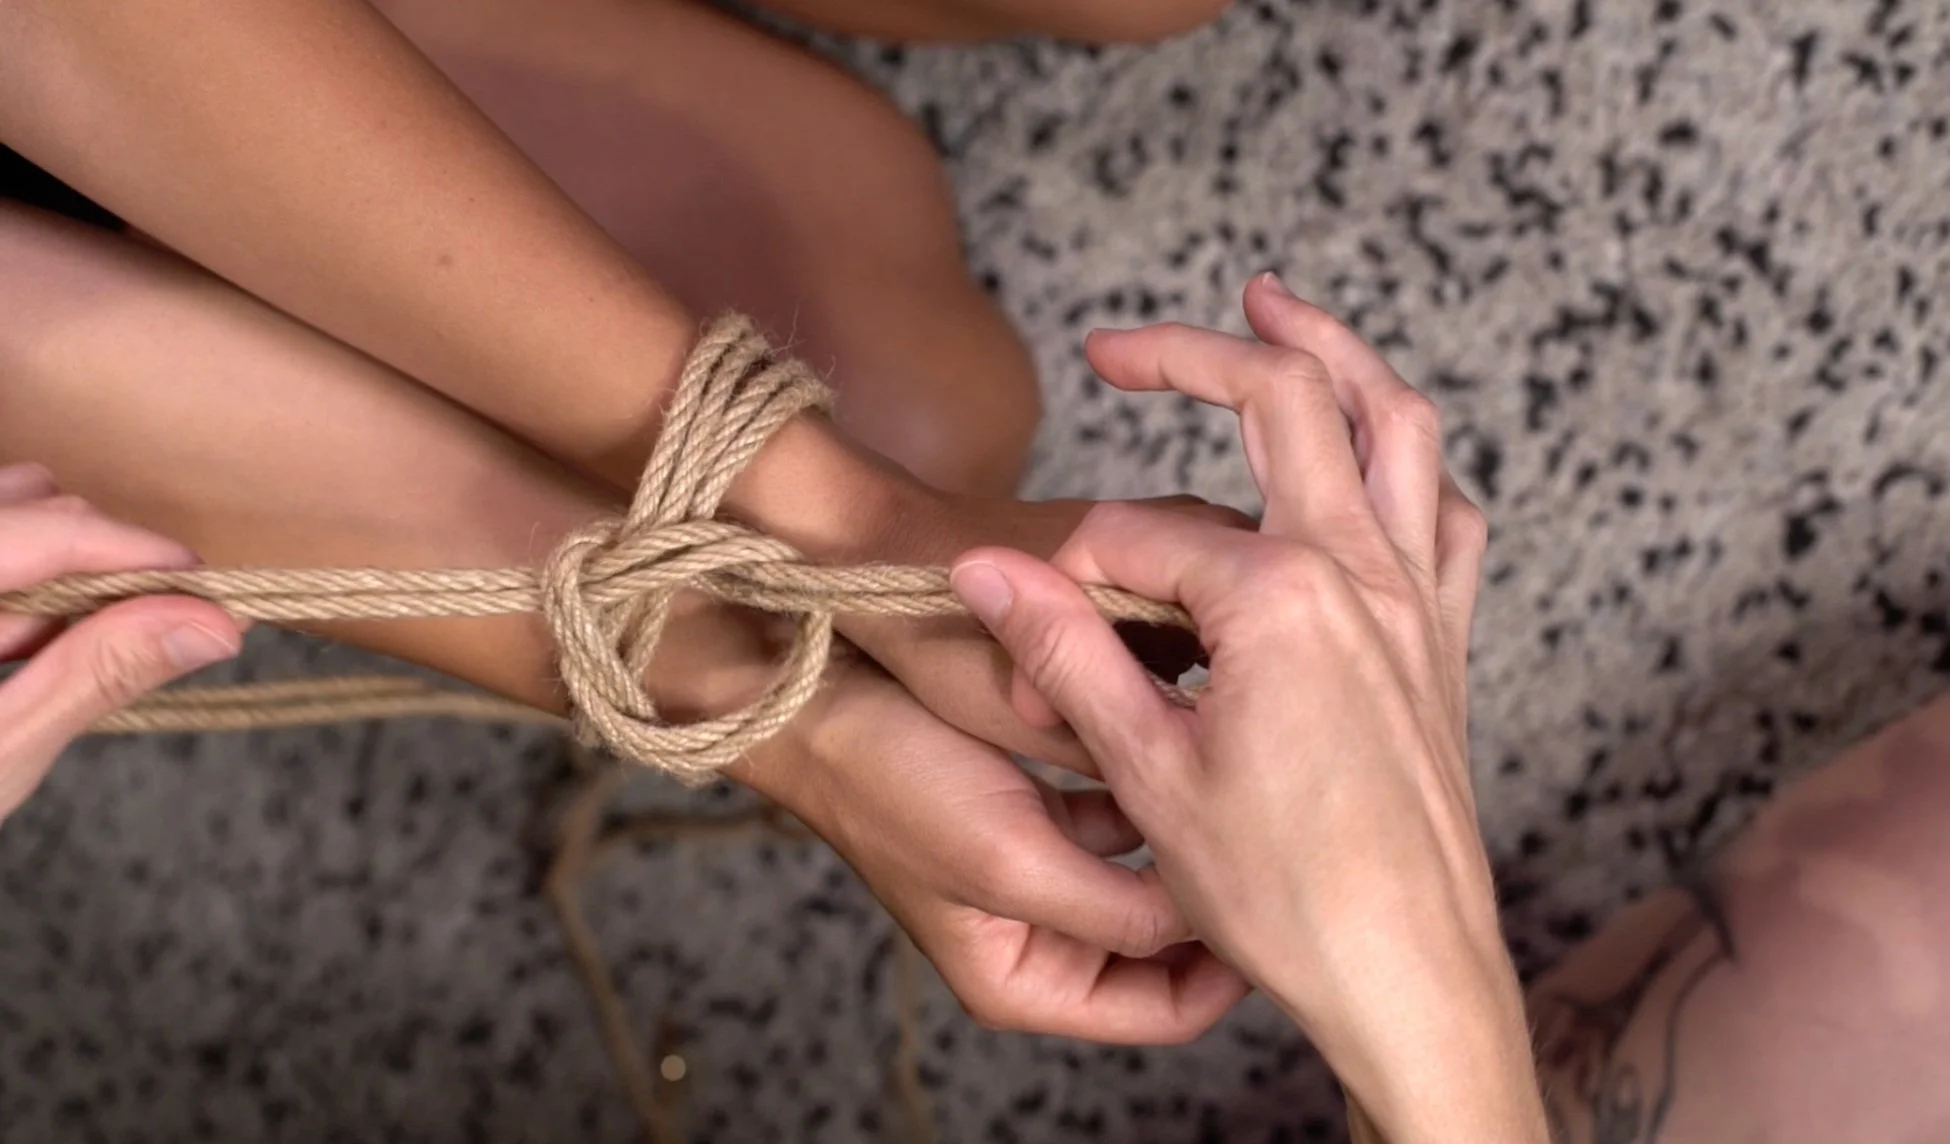
Begin by holding rope from the bight and wrap twice around the ankles, and make sure to do this above the ankle bone. Once again, You’ll end up with 3 wraps - but leave bight longer than you did with the single column.
This time, when you pull the bight over the wraps, go over the ropes below as well. This way you’re creating a lock with the rope between the ankles.
Tie a simple overhand knot, with the bight wrapping over the tail, and pull horizontally to tighten. Next do a square knot by passing the bight under the tail, then over the tail, and through the little loop that you created.
Once again, tighten horizontally the secure the tie.
-

Hojo Cuff
The hojo cuff is used together with a single column tie to bring two limbs together, so it can be two legs, an arm and a thigh, or a wrist to a bedpost.
Begin by doing either a Single Column Tie or the Sommervile Bowline on an ankle.
Pull the rope to the other ankle and wrap the rope around the other ankle twice. You’ll end up with the line running from the single column, the middle, and the tail. (Note that the bight is now stuck to the first knot, so you don’t have a bight for this second tie, which is why it’s called a hojo cuff.)
Now, wrap the tail over all those bands, making sure you cross over the line coming from the single column, and then just fold under the wraps.
To finish, you’ll do something called a half hitch, where you’ll cross the rope over the running line, and go through the loop coming from the hojo cuff. Pull through, against the other knot to tighten it.
To use up the excess rope, you can first pass the rope ends through the bight and back to the hojo cuff; this is called reverse tension.
Then you can pass the rope back and forth under the wraps to create a thick band between the ties. When you run low on rope, do a half hitch and pull the knot against the wraps around the ankle to lock it down.
-

Hog Tie
The hog tie allows you to tie the wrists and the ankles together, restricting the whole body and fulfilling all your rope play desires— Athena Gayle
You’ll begin by having your partner lay flat on their belly. Carefully place your partner's arms behind their back. Tie a single column or somerville bowline around the wrists, rotating the knot to point towards the feet.
Pull the rest of the rope towards the ankles and create a Hojo cuff by wrapping the rope around twice. You’ll end up with the line running from the single column, the middle, and the tail. Wrap the ends over the line coming from the single column and under all the wraps around the ankles.
Then pass the rope ends through the bight and back to the hojo cuff; this is called reverse tension. Then you can pass the rope back and forth under the wraps until you run low on rope.
To finish, tie a half hitch by crossing the rope over all the wraps to create a little loop. Pull the rope ends through the loop and pull the knot tight to lock it down.